Future-proofing Cybersecurity in Drug Discovery
The pharmaceutical and biotech sectors suffer more data security breaches than any other industry, with 53% resulting from malicious activity. To protect against potential ...
News
In this post I will describe how to instantiate a cluster on Google Cloud (or any other cloud platform supported by ElastiCluster) and use it to run calculations with any Cresset desktop application, i.e., Forge, Spark or Flare, on any platform – Windows, Linux or macOS.
Configuring ElastiCluster is simple, and it is a one-off operation. Once this is done, you can spin up a Linux cluster in the cloud with a single command:
elasticluster start cebroker
Within a few minutes, the cluster will be up and running, and ready to run Cresset calculations via the Cresset Engine Broker.
Once your calculations are finished and you do not need the cluster anymore, you can switch it off with another single command:
elasticluster stop cebroker
As I was new to Elasticluster and to Google Cloud, I followed the excellent Creating a Grid Engine Cluster with Elasticluster tutorial to understand how to enable the Google Cloud SDK, and generate credentials to grant ElastiCluster access to my Google Cloud account.
The rest of this blog post concentrates on the steps required to get this to work in a Linux bash shell. The same workflow runs smoothly in a macOS Terminal and in a Windows bash shell.
The process that I will follow is:
Not all the steps are necessary if you have a VPC already set-up and running on Google Cloud, but this details how to start from scratch in the minimum time.
Firstly, I suggest to follow the advice in the Creating a Grid Engine Cluster with Elasticluster tutorial and install virtualenv, in order to create a separate Python environment for ElastiCluster:
paolo@cresset77 ~/blog$ pip install virtualenvCollecting virtualenvDownloading https://files.pythonhosted.org/packages/33/5d/314c760d4204f64e4a968275182b7751bd5c3249094757b39ba987dcfb5a/virtualenv-16.4.3-py2.py3-none-any.whl (2.0MB)100% |################################| 2.0MB 7.7MB/sInstalling collected packages: virtualenvSuccessfully installed virtualenv-16.4.3
Then, create and activate a new elasticluster virtual environment:
paolo@cresset77 ~/blog$ virtualenv elasticlusterNo LICENSE.txt / LICENSE found in sourceNew python executable in /home/paolo/blog/elasticluster/bin/python2Also creating executable in /home/paolo/blog/elasticluster/bin/pythonInstalling setuptools, pip, wheel...done.paolo@cresset77 ~/blog$ cd elasticluster/paolo@cresset77 ~/blog/elasticluster$ . bin/activate(elasticluster) paolo@cresset77 ~/blog/elasticluster$
Next, clone from GitLab the Cresset fork of the elasticluster repository which contains a few Cresset-specific Ansible playbooks required to automatically set up the Cresset Engine Broker and FieldEngine machinery on the cloud-hosted cluster:
(elasticluster) paolo@cresset77 ~/blog/elasticluster$ git clone git@gitlab.com:cresset-opensource/elasticluster.git srcCloning into 'src'...remote: Enumerating objects: 13997, done.remote: Counting objects: 100% (13997/13997), done.remote: Compressing objects: 100% (4820/4820), done.remote: Total 13997 (delta 8383), reused 13960 (delta 8375)Receiving objects: 100% (13997/13997), 5.23 MiB | 1.21 MiB/s, done.Resolving deltas: 100% (8383/8383), done.
Finally, install elasticluster dependencies:
(elasticluster) paolo@cresset77 ~/blog/elasticluster$ cd src(elasticluster) paolo@cresset77 ~/blog/elasticluster/src$ pip install -e .Obtaining file:///home/paolo/blog/elasticluster/srcCollecting future (from elasticluster==1.3.dev9)Downloading https://files.pythonhosted.org/packages/90/52/e20466b85000a181e1e144fd8305caf2cf475e2f9674e797b222f8105f5f/future-0.17.1.tar.gz (829kB)100% |################################| 829kB 6.6MB/sRequirement already satisfied: pip>=9.0.0 in /home/paolo/blog/elasticluster/lib/python2.7/site-packages (from elasticluster==1.3.dev9) (19.0.3)
[...]
Running setup.py develop for elasticlusterSuccessfully installed Babel-2.6.0 MarkupSafe-1.1.1 PrettyTable-0.7.2 PyCLI-2.0.3 PyJWT-1.7.1 PyYAML-5.1 adal-1.2.1 ansible-2.7.10 apache-libcloud-2.4.0 appdirs-1.4.3 asn1crypto-0.24.0 azure-common-1.1.18 azure-mgmt-compute-4.5.1 azure-mgmt-network-2.6.0 azure-mgmt-nspkg-3.0.2 azure-mgmt-resource-2.1.0 azure-nspkg-3.0.2 bcrypt-3.1.6 boto-2.49.0 cachetools-3.1.0 certifi-2019.3.9 cffi-1.12.2 chardet-3.0.4 click-7.0 cliff-2.14.1 cmd2-0.8.9 coloredlogs-10.0 contextlib2-0.5.5 cryptography-2.6.1 debtcollector-1.21.0 decorator-4.4.0 dogpile.cache-0.7.1 elasticluster enum34-1.1.6 funcsigs-1.0.2 functools32-3.2.3.post2 future-0.17.1 futures-3.2.0 google-api-python-client-1.7.8 google-auth-1.6.3 google-auth-httplib2-0.0.3 google-compute-engine-2.8.13 httplib2-0.12.1 humanfriendly-4.18 idna-2.8 ipaddress-1.0.22 iso8601-0.1.12 isodate-0.6.0 jinja2-2.10.1 jmespath-0.9.4 jsonpatch-1.23 jsonpointer-2.0 jsonschema-2.6.0 keystoneauth1-3.13.1 monotonic-1.5 msgpack-0.6.1 msrest-0.6.6 msrestazure-0.6.0 munch-2.3.2 netaddr-0.7.19 netifaces-0.10.9 oauth2client-4.1.3 oauthlib-3.0.1 openstacksdk-0.27.0 os-client-config-1.32.0 os-service-types-1.6.0 osc-lib-1.12.1 oslo.config-6.8.1 oslo.context-2.22.1 oslo.i18n-3.23.1 oslo.log-3.42.3 oslo.serialization-2.28.2 oslo.utils-3.40.3 paramiko-2.4.2 pathlib2-2.3.3 pbr-5.1.3 pyOpenSSL-19.0.0 pyasn1-0.4.5 pyasn1-modules-0.2.4 pycparser-2.19 pycrypto-2.6.1 pyinotify-0.9.6 pynacl-1.3.0 pyparsing-2.4.0 pyperclip-1.7.0 python-cinderclient-4.1.0 python-dateutil-2.8.0 python-gflags-3.1.2 python-glanceclient-2.16.0 python-keystoneclient-3.19.0 python-neutronclient-6.12.0 python-novaclient-9.1.2 pytz-2018.9 requests-2.21.0 requests-oauthlib-1.2.0 requestsexceptions-1.4.0 rfc3986-1.2.0 rsa-4.0 scandir-1.10.0 schema-0.7.0 secretstorage-2.3.1 simplejson-3.16.0 six-1.12.0 stevedore-1.30.1 subprocess32-3.5.3 typing-3.6.6 unicodecsv-0.14.1 uritemplate-3.0.0 urllib3-1.24.1 warlock-1.3.0 wcwidth-0.1.7 wrapt-1.11.1
Open your favorite text editor and create an ~/.elasticluster/config file with the following content:
# slurm software to be configured by Ansible[setup/ansible-slurm]provider=ansible# ***EDIT ME*** add cresset_flare only if you plan to run Flare calculationsfrontend_groups=slurm_master,cresset_common,cresset_broker,cresset_flarecompute_groups=slurm_worker,cresset_common# ***EDIT ME*** set the path to your Cresset licenseglobal_var_cresset_license=~/path/to/your/cresset.lic
# Create a cloud provider (call it 'google-cloud')[cloud/google-cloud]provider=google# ***EDIT ME*** enter your Google project ID heregce_project_id= xxxx-yyyyyy-123456# ***EDIT ME*** enter your Google client ID heregce_client_id=12345678901-k3abcdefghi12jklmnop3ab4b12345ab.apps.googleusercontent.com# ***EDIT ME*** enter your Google client secret heregce_client_secret=ABCdeFg1HIj2_aBcDEfgH3ij
# Create a login (call it 'google-login')[login/google-login]image_user=cebrokerimage_user_sudo=rootimage_sudo=Trueuser_key_name=elasticlusteruser_key_private=~/.ssh/google_compute_engineuser_key_public=~/.ssh/google_compute_engine.pub
# Bring all of the elements together to define a cluster called 'cebroker'[cluster/cebroker]cloud=google-cloudlogin=google-loginsetup=ansible-slurmsecurity_group=defaultimage_id=ubuntu-minimal-1804-bionic-v20190403frontend_nodes=1# ***EDIT ME*** set compute_nodes to the number of worker nodes that you# wish to startcompute_nodes=2image_userdata=ssh_to=frontend
[cluster/cebroker/frontend]flavor=n1-standard-2
[cluster/cebroker/compute]# ***EDIT ME*** change 8 into 2, 4, 8, 16, 32, 64 depending on how many cores# you wish on each worker nodeflavor=n1-standard-8
The only bits that you will need to edit are those highlighted in red, i.e.:
cresset_flare if you are planning to run Flare calculations on the clusterThe example above uses a dual-core node to act as the head node (the Cresset Engine Broker does not need huge resources) and starts two 8-core nodes as worker nodes; you may well want to use more and beefier nodes, but this is meant as a small, inexpensive example.
At this stage, you are done with the configuration part. Please note that you only need to do this once; the only future action that you may want to carry out is changing the configuration to modify the type/number of your worker nodes.
This is the single command that you need to run, as advertised in the blog post headline:
(elasticluster) paolo@cresset77 ~/blog/elasticluster$ elasticluster start cebrokerStarting cluster `cebroker` with:* 1 frontend nodes.* 2 compute nodes.(This may take a while...)
If you feel like having a coffee, this is a good time to brew one – bringing up the cluster will take a few minutes.
If everything works well, at the end of the process you should see:
Your cluster cebroker is ready!
Cluster name: cebrokerCluster template: cebrokerDefault ssh to node: frontend001- compute nodes: 2- frontend nodes: 1
To login on the frontend node, run the command:
elasticluster ssh cebroker
To upload or download files to the cluster, use the command:
elasticluster sftp cebroker
Now ssh into your frontend node, forwarding port 9500 to localhost:
(elasticluster) paolo@cresset77 ~/blog/elasticluster$ elasticluster ssh cebroker -- -L9500:localhost:9500Welcome to Ubuntu 18.04.2 LTS (GNU/Linux 4.15.0-1029-gcp x86_64)
* Documentation: https://help.ubuntu.com* Management: https://landscape.canonical.com* Support: https://ubuntu.com/advantage
Get cloud support with Ubuntu Advantage Cloud Guest:http://www.ubuntu.com/business/services/cloudThis system has been minimized by removing packages and content that arenot required on a system that users do not log into.
To restore this content, you can run the 'unminimize' command.
0 packages can be updated.0 updates are security updates.
Last login: Mon Apr 8 21:28:16 2019 from 81.144.247.249
cebroker@frontend001:~$
Tunnelling port 9500 through ssh creates a secure, encrypted SSL connection to the Cresset Engine Broker running in the cloud. You probably won’t need this if you already have configured your VPC in Google Cloud.
You may easily verify that the Cresset Engine Broker is already running on the frontend node, waiting for connections from Cresset clients:
cebroker@frontend001:~$ systemctl status cresset_cebroker2* cresset_cebroker2.service - server that allows Cresset products to start/connect to remote FieldEnginesLoaded: loaded (/etc/systemd/system/cresset_cebroker2.service; static; vendor preset: enabled)Active: active (running) since Mon 2019-04-08 21:41:50 UTC; 8min agoProcess: 20917 ExecStop=/bin/bash /opt/cresset/CEBroker2/documentation/init.d/cresset_cebroker2.sh stop /var/run/CEBroker2.pid (code=exited, status=0/SUCCESS)Process: 20930 ExecStart=/bin/bash /opt/cresset/CEBroker2/documentation/init.d/cresset_cebroker2.sh start /var/run/CEBroker2.pid (code=exited, status=0/SUCCESS)Main PID: 20956 (CEBroker2.exe)Tasks: 0 (limit: 4915)CGroup: /system.slice/cresset_cebroker2.service> 20956 /opt/cresset/CEBroker2/lib/CEBroker2.exe --pid /tmp/tmp.Y7Wvk135fM -p 9500 -P 9501 -s /opt/cresset/CEBroker2/documentation/examples/start_SLURM_engine.sh -m 16 -M 16 -v
Now, start a Forge client running on your local machine.
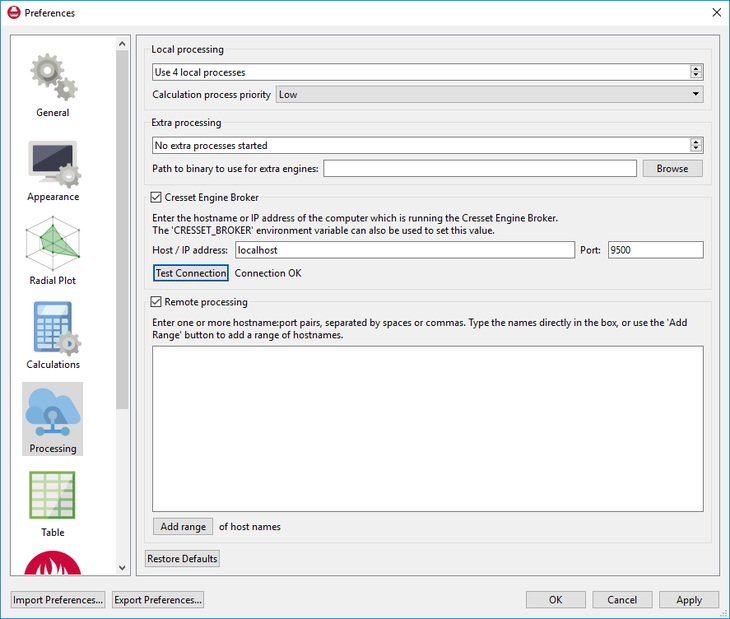
In the Processing Preferences, configure the Cresset Engine Broker to Host localhost, Port 9500, and press the ‘Test Connection’ button; you should see ‘Connection OK’:

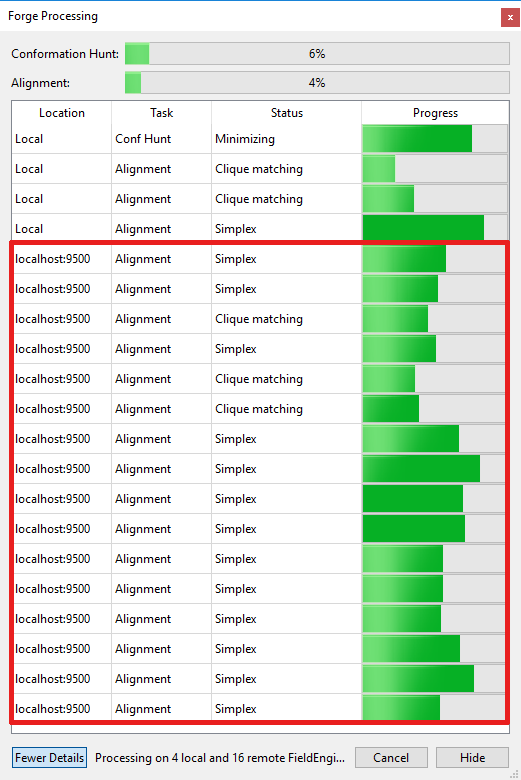
Now, align a dataset against a reference. In addition to your local processes, you should see 16 remote processes running on your cloud-hosted cluster:

Using remote computing resources requires a Cresset Engine Broker license and a Remote FieldEngine license; please contact us if you do not currently have such licenses and wish to give this a try. And do not hesitate to contact our support team if you need help to get the above working for you.